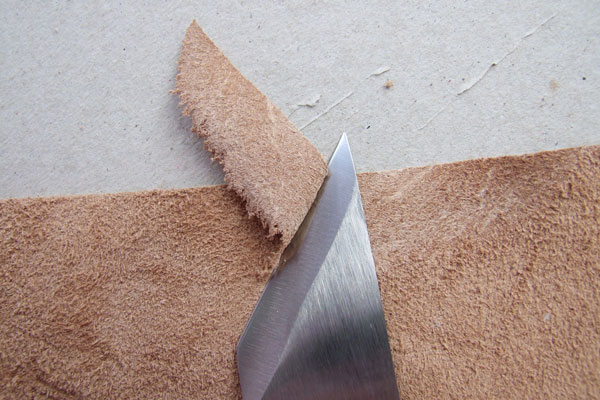
Left handed English paring knife ~
paring leather ~ moving from right to left
The English Paring Knife is described elsewhere [124588]. Succesful paring of leather requires a very sharp knife. As supplied from the factory these knives are very sharp ~ and on first testing they are usually found to do a good job. New users will not know how much better they can work with such a knife if it is more fully prepared for fine working beyond the factory-fresh edge. Read on ~ there is much to learn! The notes on this page are mainly prosaic. I plan to provide copious illustrations as opportunity permits ~ 'tomorrow'.
Knives such as this are sent from the factory ~ and normally sold ~
Before use a new knife will need further work ~ it has to be
Brief explanations for these terms follow, and there will be links to lengthy notes ~ with illustations ~ on each process. I discuss flattening last of all since it is only required once ~ on a new knife.
Allow an hour for all these tasks to be done properly on the first occasion. Some only need to be done once. Some can be done quite quickly ~ especially on subsequent occasions. Frequent 'sharpening' might only require some stropping. Setting and maintaining the correct angle for grinding and sharpening is an extremely important skill ~ and very difficult to learn and manage.
Tool steels are not necessarily rust-proof. Rust can cause indentations in the surface. Since sharpening requires removal of all irregularities then rust is a particular enemy. An oily film on the surface of the knife prevents water ingress and thence rusting. Unfortunately for many uses ~ particularly with paper ~ any form of oiliness is to be avoided. The grease has to be removed and therafter the knife must be kept dry at all times. Grease is best wiped off with a soft cloth or tissue ~ a few drops of solvent such as paraffin will help.
This involves removing a great deal of steel to restore the whole edge of the knife to the 'as made' condition. It must never be undertaken on a high-speed grinding wheel ~ which (from its name) seems a reasonable thing to do. There is a great deal more to learn about grinding. A slow speed ~ large diameter ~ water-cooled ~ wheel is required.
For this task an oilstone ~ wet stone ~ diamond stone ~ or emery cloth ~ or silicon carbide paper ~ or somesuch is required. If flexible abrasive surfaces are used then they need to be reting ~ preferably secured ~ to a very flat surface. Sharpening removes a little more steel ~ all along the edge ~ and at a different angle ~ from the edge of the blade. edge. A blunt knife has an imperceptibly rounded edge which needs to be freshly angled-off ~ which can take several minutes. A fairly sharp knife will not need much more sharpening ~ four or five strokes on a good diamond stone will suffice.
For this a strip of leather is used in combination with appropriate grinding paste. The requirement is to remove the small saw-like bumpy ridges left by the freshly sharpened edge of the blade. You may not be able to see these ~ they cause the blade to have a slightly matte surface. It is closely aligned to polishing. (Think of matte ~ satin ~ and gloss paint.)
A fresh strip of smooth leather without any paste is sometimes used for this ~ the final step in obtaining a keen edge by ensuring no tiny bumps remain to act as abrasives to the knife's progress as it cuts. A well polished knife will appear much as a mirror does ~ very shiny.
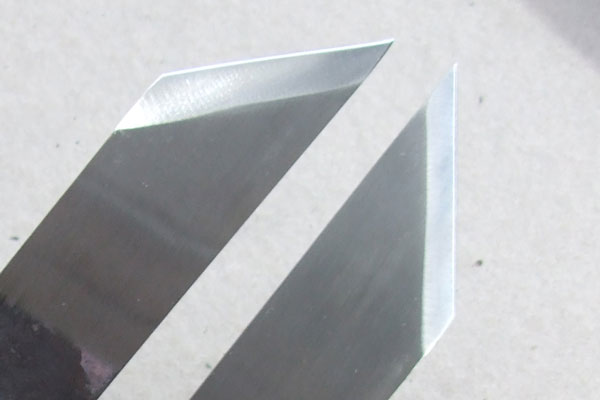
When a blade is manufactured there are heating ~ quenching ~ cutting ~ forging ~ shaping ~ operations which may appear to leave a flat blade. In practice the plane surface of the non-ground side may not be quite flat enough ~ or smooth enough ~ for expert use.
To flatten a blade a really flat stone or glass-and-abrasive cloth set-up is required. Depending on the amount of flattening required grinding starts with coarse grits and works steadily through to the finest of grades ~ finishing with a stropping.
The aim is to achieve a mirror finish over as much of the blade as possible, but certainly for the centimetre or so nearest the grinding edge. There is one vital ~ golden ~ essential ~ rule to all this the blade must always be flat on the stone. The ground side of the blade has multiple surfaces, at different angles ~ the flat side has only one surface. A momentary lift of the blade whilst grinding or sharpening or honing will spoil ~ effectively blunt ~ the edge that is to be sharpened. More importantly the knife will not glide as smoothly over the surface ebing pared ~ it will tend to rise (perhaps imperceptibly ~ but enough to need more skill than is already required.
This can be applied to any knife when it is planned to use it as a scraper. De-burring is the removal of bits of metal that have not been removed by the grinding wheel.
Items such as this are available to purchase from our sister store at busybusy.shop, or at most stores offering bookbinding supplies.
